I noticed in preparing for my talk about stock photography on October 16 that some of the contributor links in the older articles are out of date, so I’ve included all current contributor links below, with my biggest sellers in bold:
The Shutterstock include a referral code, which means that if you get in I get a small fee for the first few photos you sell. It doesn’t come out of your money, it’s an extra thank you to me for having referred you. I appreciate the support!
The posting is up for my upcoming Stock Photography talk at the Ann Arbor District Library!
Getting Started in Stock Photography
Wednesday October 16, 2019: 7:00pm to 8:30pm
Downtown Library: Multi-Purpose Room
Description: Have you ever wondered if you could make money from your photography? Are you ready for a new challenge, or just want to experience the thrill of seeing your photograph in national publications? Local photographer Susan Montgomery will explain what stock photography is, share her journey with photography, and walk you through the steps to help you get started in stock photography using examples from her own work. Susan Montgomery is a stock, nature and travel photographer. Susan has ten years of experience in stock photography and has had an article on stock photography published by Digital Photography School. You can see her stock photos at http://www.shutterstock.com/g/smontgom and many other stock photo sites. Check out her blog about stock photography at SusanMontgomeryPhotos.com! https://aadl.org/node/396049
I listed the draft of what my talk will include here.
A tearsheet is named after the torn pages from magazines you would have had in the past to showcase your work. I learned the value of actual pages or screenshots when I went back to my old “Sightings of my photos” page and realized that some of the links to some of my coolest sightings went to dead pages, so sad…
I then searched for the best examples of my work in the most noteworthy publications I could find. I performed Google image searches of my most popular photos, as well as word searches such as ‘ “Susan Montgomery” Shutterstock -www.shutterstock.com .’ I created the tearsheet using the best references, included brief citations in the “title” sections so they’d show up in the slideshows. I then also realized I wanted my tearsheet to be a “page” on the top of my blog, rather than a post, so it’s more permanent and easier to access. I created a “Page” and copied the content from my post to the page.
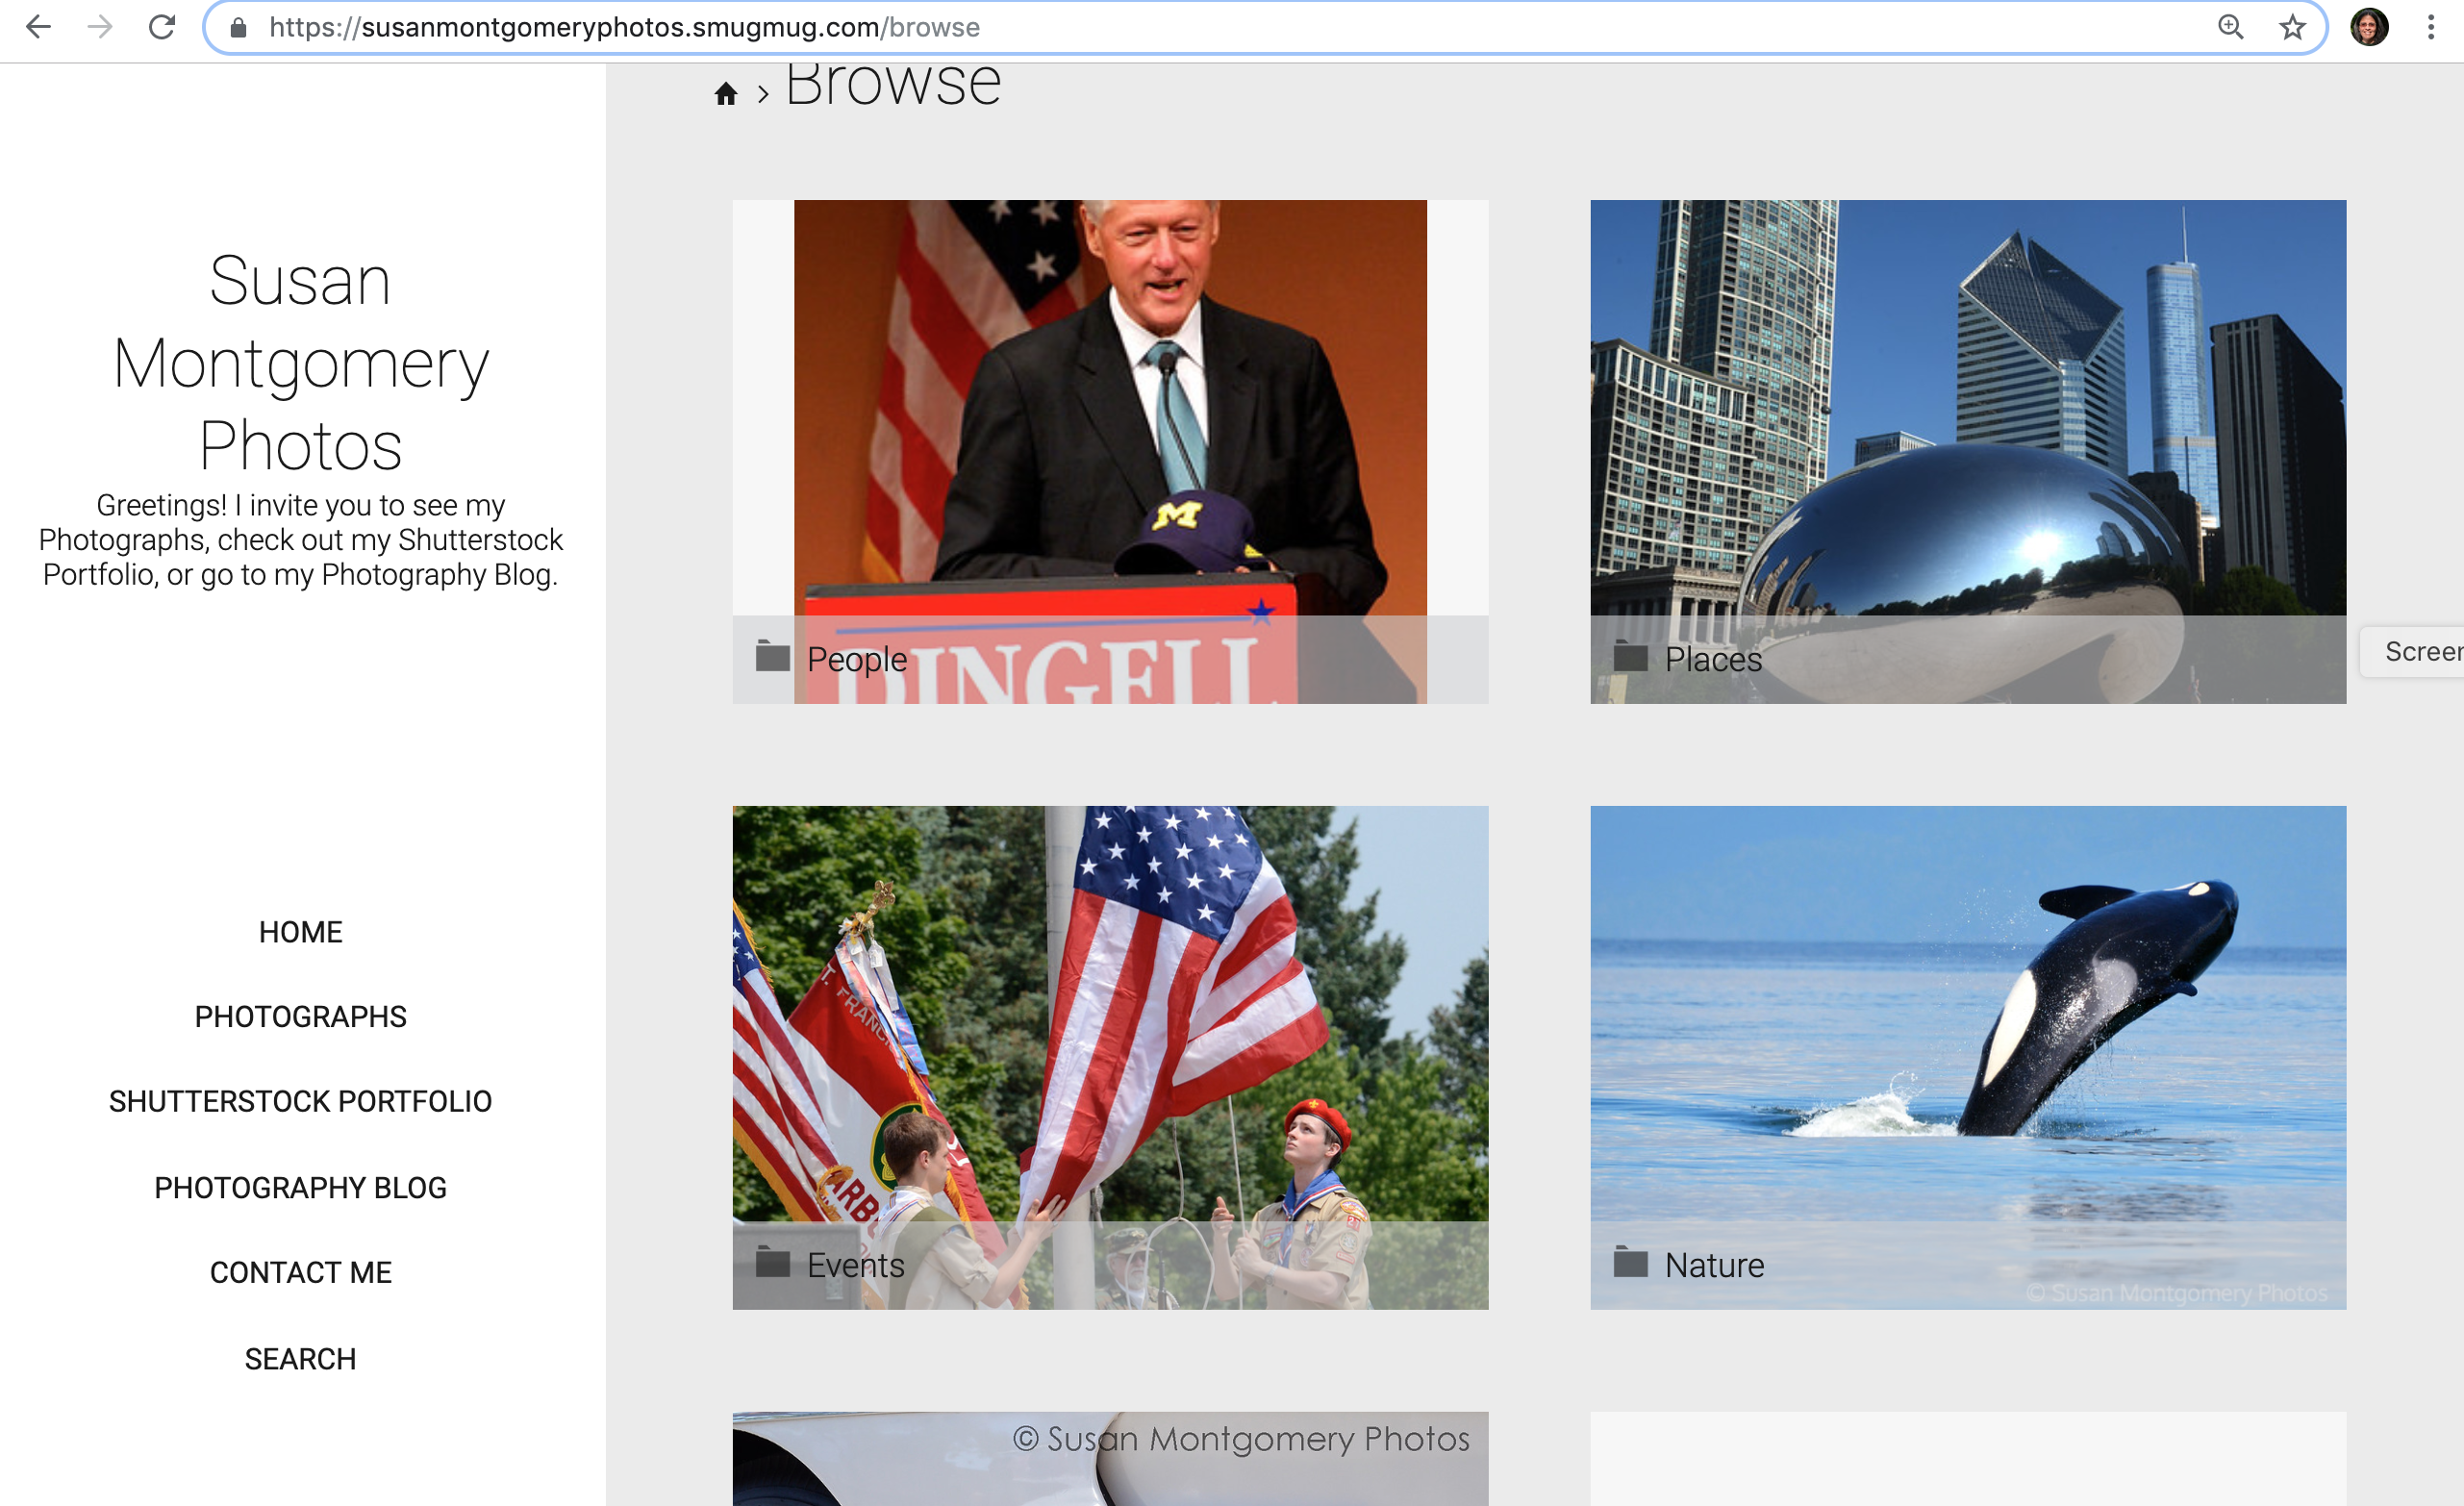
I am happy to announce that I have created a SmugMug gallery! I did a lot of research and a SmugMug gallery together with this blog seemed like the best solution for me. In this entry I am sharing what I did to help others who might be considering starting one.
I intend to use my SmugMug gallery to:
Showcase my photos to friends and photo editors that I might contact in the future so they can see samples.
Make event photos available for download for groups. These will mostly be photos of events that I am making available for free to the event organizers.
Maybe even sell a photo or two…
Selecting a Format
I looked for a “clean” format, chose one named Dina, and adapted it just a bit to have a “White Duotone” background to have a slightly different color in the menu portion on the left. It was very easy to add sections to the menu:
Uploading photos
Uploading photos was very easy, and I could place them in “galleries” that can be organized into “folders:”
I just uploaded them from my laptop, but you also have the option to upload from other sources, e.g. Lightroom. Arranging folders and galleries was very intuitive. I have reorganized the galleries and folders easily, e.g. I had a “photojournalism” folder for “events,” then decided to move “events” to the top layer, nothing to it, just scoot galleries around like you would folders on your computer.
Displaying the photos within a gallery
There are many ways to display the photos. I went with Collage Landscape, but there are many other ways, and it would be trivial to change that if I were to change my mind, either for individual galleries or globally. You can also determine whether to include a slideshow, and many other features:
Help features very useful
SmugMug has a very helpful support center that walks you through the whole process, a search for help lands you on very relevant and useful articles:
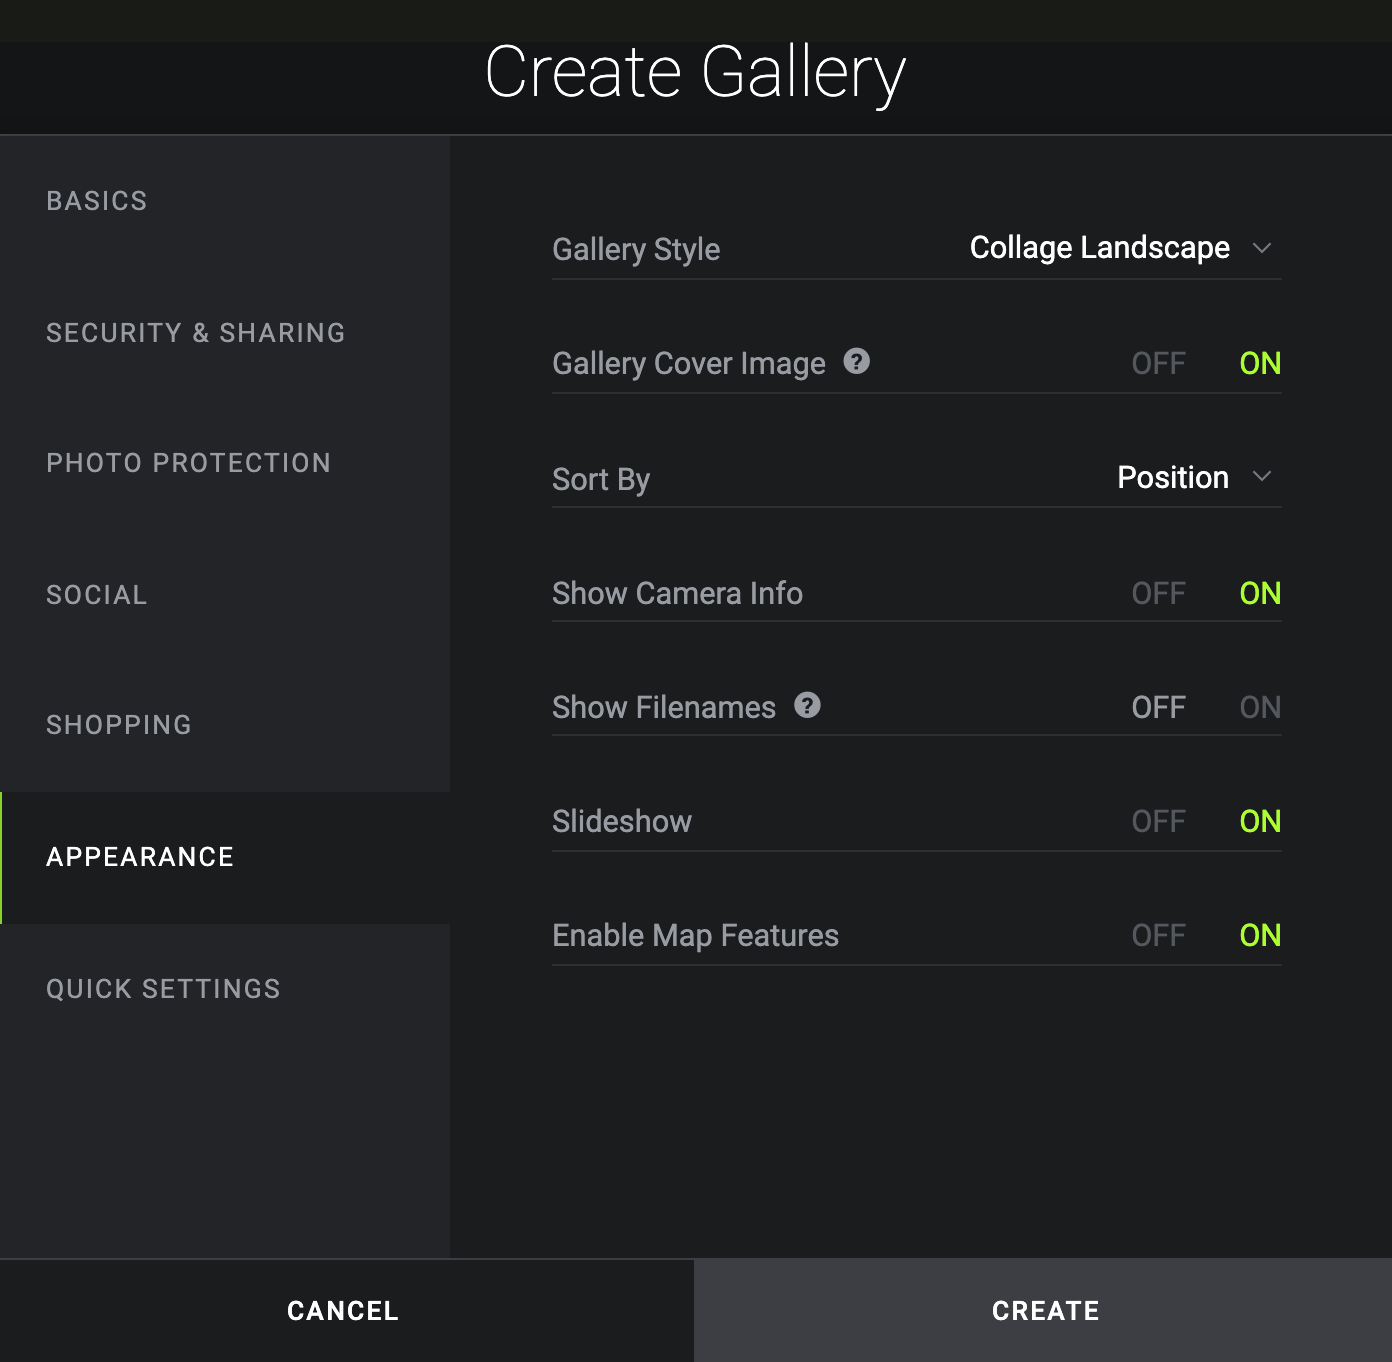
Photo security options
SmugMug gives you many options to secure your photos. After much research I decided to take three steps:
Set a small image size for the displayed image, so if someone downloads an image it’s not of great quality, not suitable for framing, etc. I might decide to go even smaller in the future, we’ll see
Add a watermark to the photos – SmugMug makes this trivially easy, you can save a watermark image, or create on within SmugMug, which I did, then when you create a gallery you can tell it to add a watermark to all photos in the “Photo Protection” section. So the watermark shows up on the screen and downloaded photos, but not in ordered ones.
I realize none of these are totally foolproof, they can take a screenshot, etc. but I’ve done what I can, I’ll leave it at that.
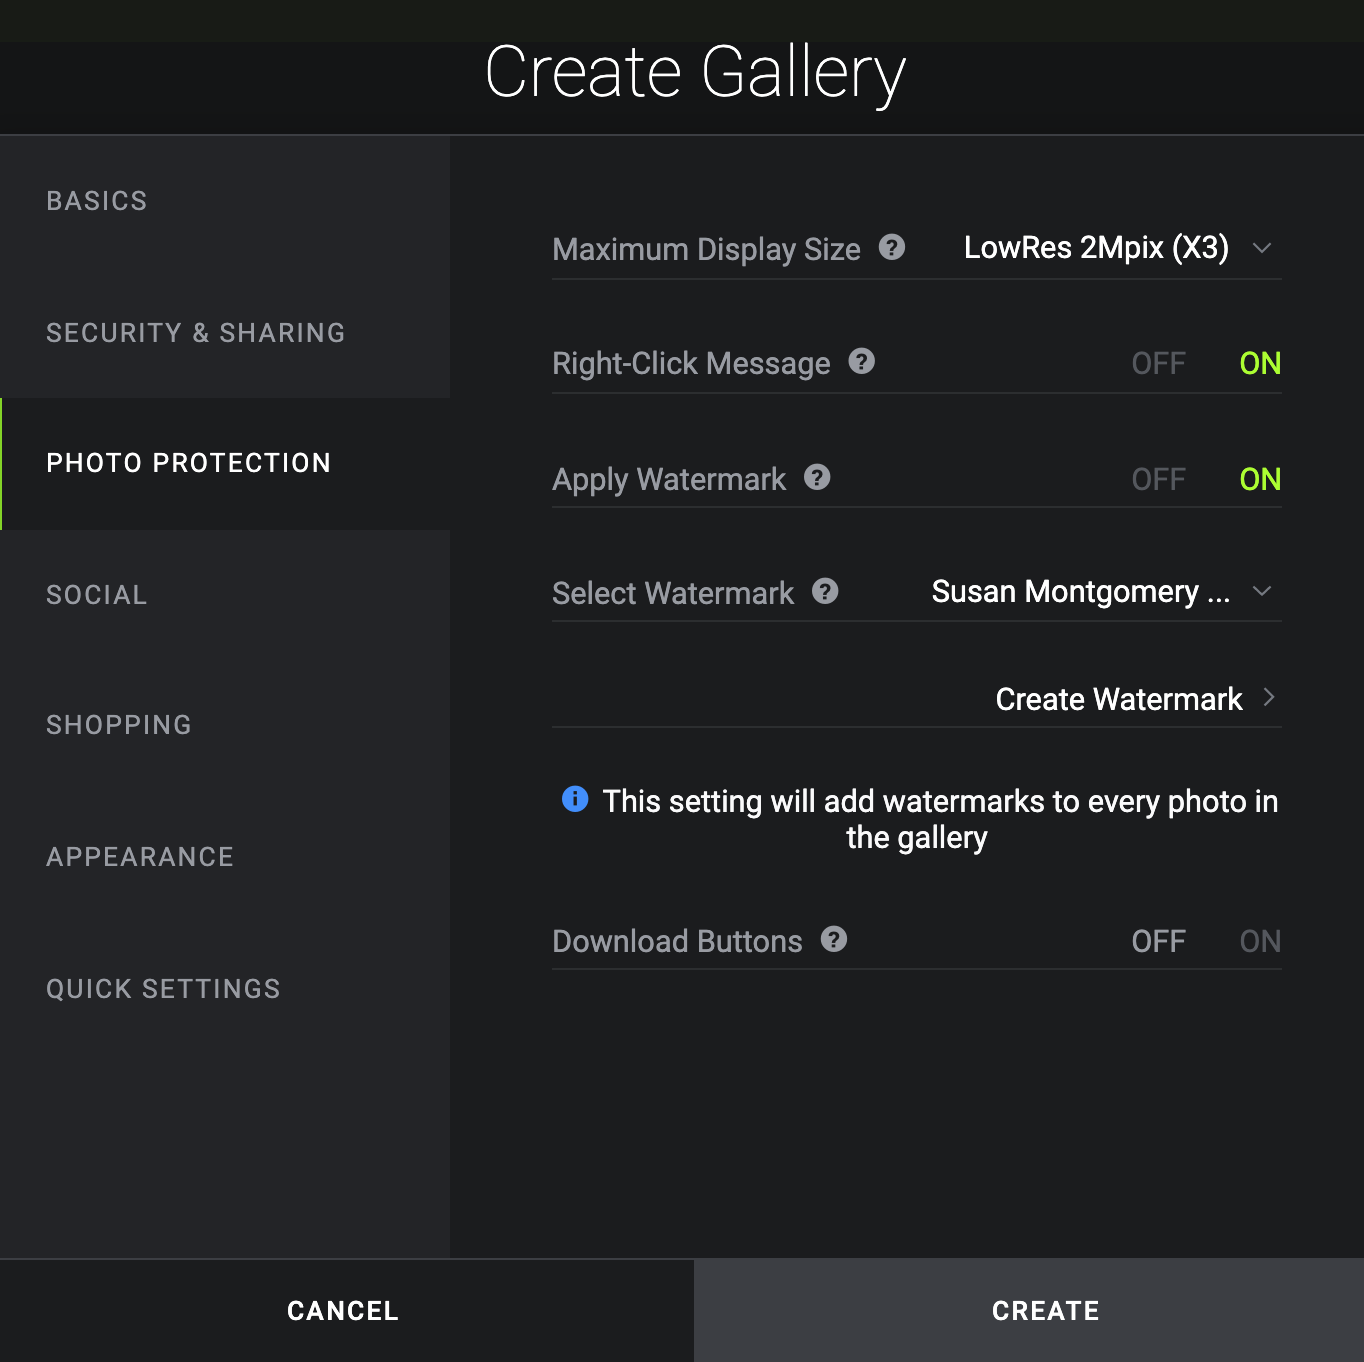
Selecting a subscription
I also had to decide which subscription to get. The current options are:
As a professional photographer the plan is to have some sales, so I went with the Portfolio option. I originally selected the Pro option, then I realized that was overdoing it for my purposes so I changed it to Portfolio and they updated it right away and gave me a credit, didn’t have to wait until renewal time, which I very much appreciated.
As for prices for sales, I decided to just go with the SmugMug presets, we’ll see how it goes.
Next steps
If you have any other questions about setting up a SmugMug website let me know in the comments below and I’ll do my best to answer them. In the meantime, if you decide to proceed yourself, you can get 20% off your first year subscription if you use this link , or the one at the top of the page, to get started. Full disclosure, I also get 20% off your subscription price toward my next update, thanks!
Best wishes on YOUR photography (and SmugMug!) adventures!
I have written Artist Statements for a number of shows now, and I remember not knowing at first what to include in them, so for those of you who are new, here are some suggestions based on what I have done myself and from reading others’ artists statements at the shows I have been in.
Items to consider including:
Name, email, website
Brief bio, particularly about you as a photographer
A photograph of you, and/or a business card
Philosophy of what photography means to you, what inspires you
Information about the piece(s), any theme you might have, why it interested you.
Details on the camera you use (I don’t do this, but more techy folks do)
Thank you to the exhibit organizers
Some type of “hope you enjoy the piece” statement to the visitors.
Picture Correct has a great infographic on how to become a professional photographer, with steps to take and resources for each step. I’m glad to see I can actually consider myself a professional photographer after looking at it!
The major sections they address, with many details within, are:
Decide what kind of photographer you want to become
So I’d been thinking about it and finally did it this month. I became a member of the Ann Arbor Women Artists group. I had seen their name around many of the coffeehouses in town that have art exhibits and had set it as a goal this summer to become a member. Looks like in addition to the exhibits they have a number of talks, workshops, etc. that should be useful. Not quite sure how involved I’ll be able to be with the school year starting, but I am glad to at least be a part of the group and a bigger artistic community. Maybe I can see about exhibiting those framed car photos…
I recently created a gallery on Fine Art Americato allow people to purchase prints, cards, etc. of some of my photographs. I first researched various such POD (Print On Demand) sites, and selected this one because:
– You keep ownership of your photos
– You set the profit you make for each order
– It’s only $30 a year to place unlimited photos
– It seemed to have good flow and generally good user reviews.
– You can “sponsor” pages by having links to search pages from your website, which in theory prioritizes your photo to the third line of the search results. Though of course with popular searches you really just get a higher chance to be on that third line, we’ll see how well that works out…
At any rate, it’s an intriguing next steps to my photography adventures, so we’ll see how that goes… You bet if I sell something I’ll be all sorts of excited and you’ll hear from me here… If you have had experience with Fine Art America I’d love to hear of your experience, please drop me a comment, thanks!
So you might recall that my photos got accepted for a solo exhibit. In preparation for it I made labels for each framed photograph. I looked around for ideas and ended up choosing to print them on 3 x 5 unlined cards, perfect size to fit the information I needed.
__________________________________________
Name of piece
Detailed name
year, H x W inches (note that it’s height x width)
Description of piece (optional)
Your name
Contact info, website Price
__________________________________________
I designed them in Microsoft Word, and set the paper size to 3″ x 5″ and just printed them on the 3×5 cards, easy peasy, didn’t have to worry about cutting them uniformly. I printed another set on regular paper, two to a page, to tape the description to the back of each piece.
We then put them on the wall with UHU Tac Removable Adhesive Putty Tabs, some on each top corner. I had printed an extra set of cards just in case, but didn’t end up needing them – better safe than sorry…
So I had been going along making some money with my photography hobby, then a bit more, enough to buy new equipment, and of course I was paying taxes on that money, but was not keeping track of expenses. I also decided to put in a proposal for the gifts of art program at UM, which if accepted, would allow me to sell my framed photographs, which means charging state taxes, and I need to be a business owner to charge taxes… you see it was starting to get big.
So, time to become a small business. I looked around the internet researching different business options and decided that since I don’t intend to shoot weddings or other such situations that might end up with me being sued, and I’m not planning to have employees, I didn’t think I needed to become incorporated. Instead I went with the “sole proprietorship” model, which in Michigan is sometimes also referred to as DBA, or “doing business as,” such as me doing business as Susan Montgomery Photos.
So time to keep the money separate. I checked my local credit union’s website about opening up a business account, and found out that I had to bring a “Certificate of Assumed Name or Doing Business As Certificate.” A bit of research in the State of Michigan website and I downloaded the form, got the notary public signature, filed at my county courthouse, back to the credit union, and voila, I have a business account, with checks and a debit card, and I started a Paypal account in my business name. Small business person me, who’d a thunk it.
One of my big points here is that I didn’t know anything about this when I started. I just took it one step at a time, learned what I had to learn, checked with some friends to make sure I wasn’t making any terrible mistakes, and I keep learning. Don’t be intimidated. There is a lot of knowledge out there, seek it out as you need it. As my neighbor Linda says about running 5k’s, “It’s just taking one step after another.” If I can do it, so can you – really!
Disclaimer: I am merely sharing my experience here, I have no legal expertise, so please do your own research to determine which options works best for you.
I have found having business cards to be very helpful as a stock photographer. My latest version has one of my photos as the background, the URL for this blog, my Shutterstock portfolio address, and my email address, which I’ve obscured in this photo:
They’re useful to have when I’m photographing an event, so I can reassure people that I’m a professional, and I explain that I’m taking photos for a stock photography site. I let them know I’d be happy to send them their photo if they choose to email me, and to look for their photo in the Shutterstock site. People have invariably been very happy to have their photos taken, such as this one at last year’s civil war remembrance in Greenfield Village:
Now that I have this blog I’ll also be able to give it to people who ask me about stock photography.
I got them from Vistaprint, $20 for 250 nice quality cards. My earlier cards were double-sided, but I decided to have the back side blank on this new set so I can write notes on it.