My workflow for editorial photos of classic car shows

Just submitted some editorial photos of some classic cars to Shutterstock, thought I’d share my workflow. You can see my classic car show photos here.

Taking the photograph is of course the most important part. For classic car show photos, such as this one from last summer’s Woodward Dream Cruise:

Woodward Cruise 2013

I can easily spend 15 minutes waiting for the crowds to thin out so you can see the car itself, yet have enough people in front of it for personal interest. Funny thing is that people in the midwest are really nice so they are all trying to get out of your way so you can get the car shot, so I have to explain that I want the crowd shot…

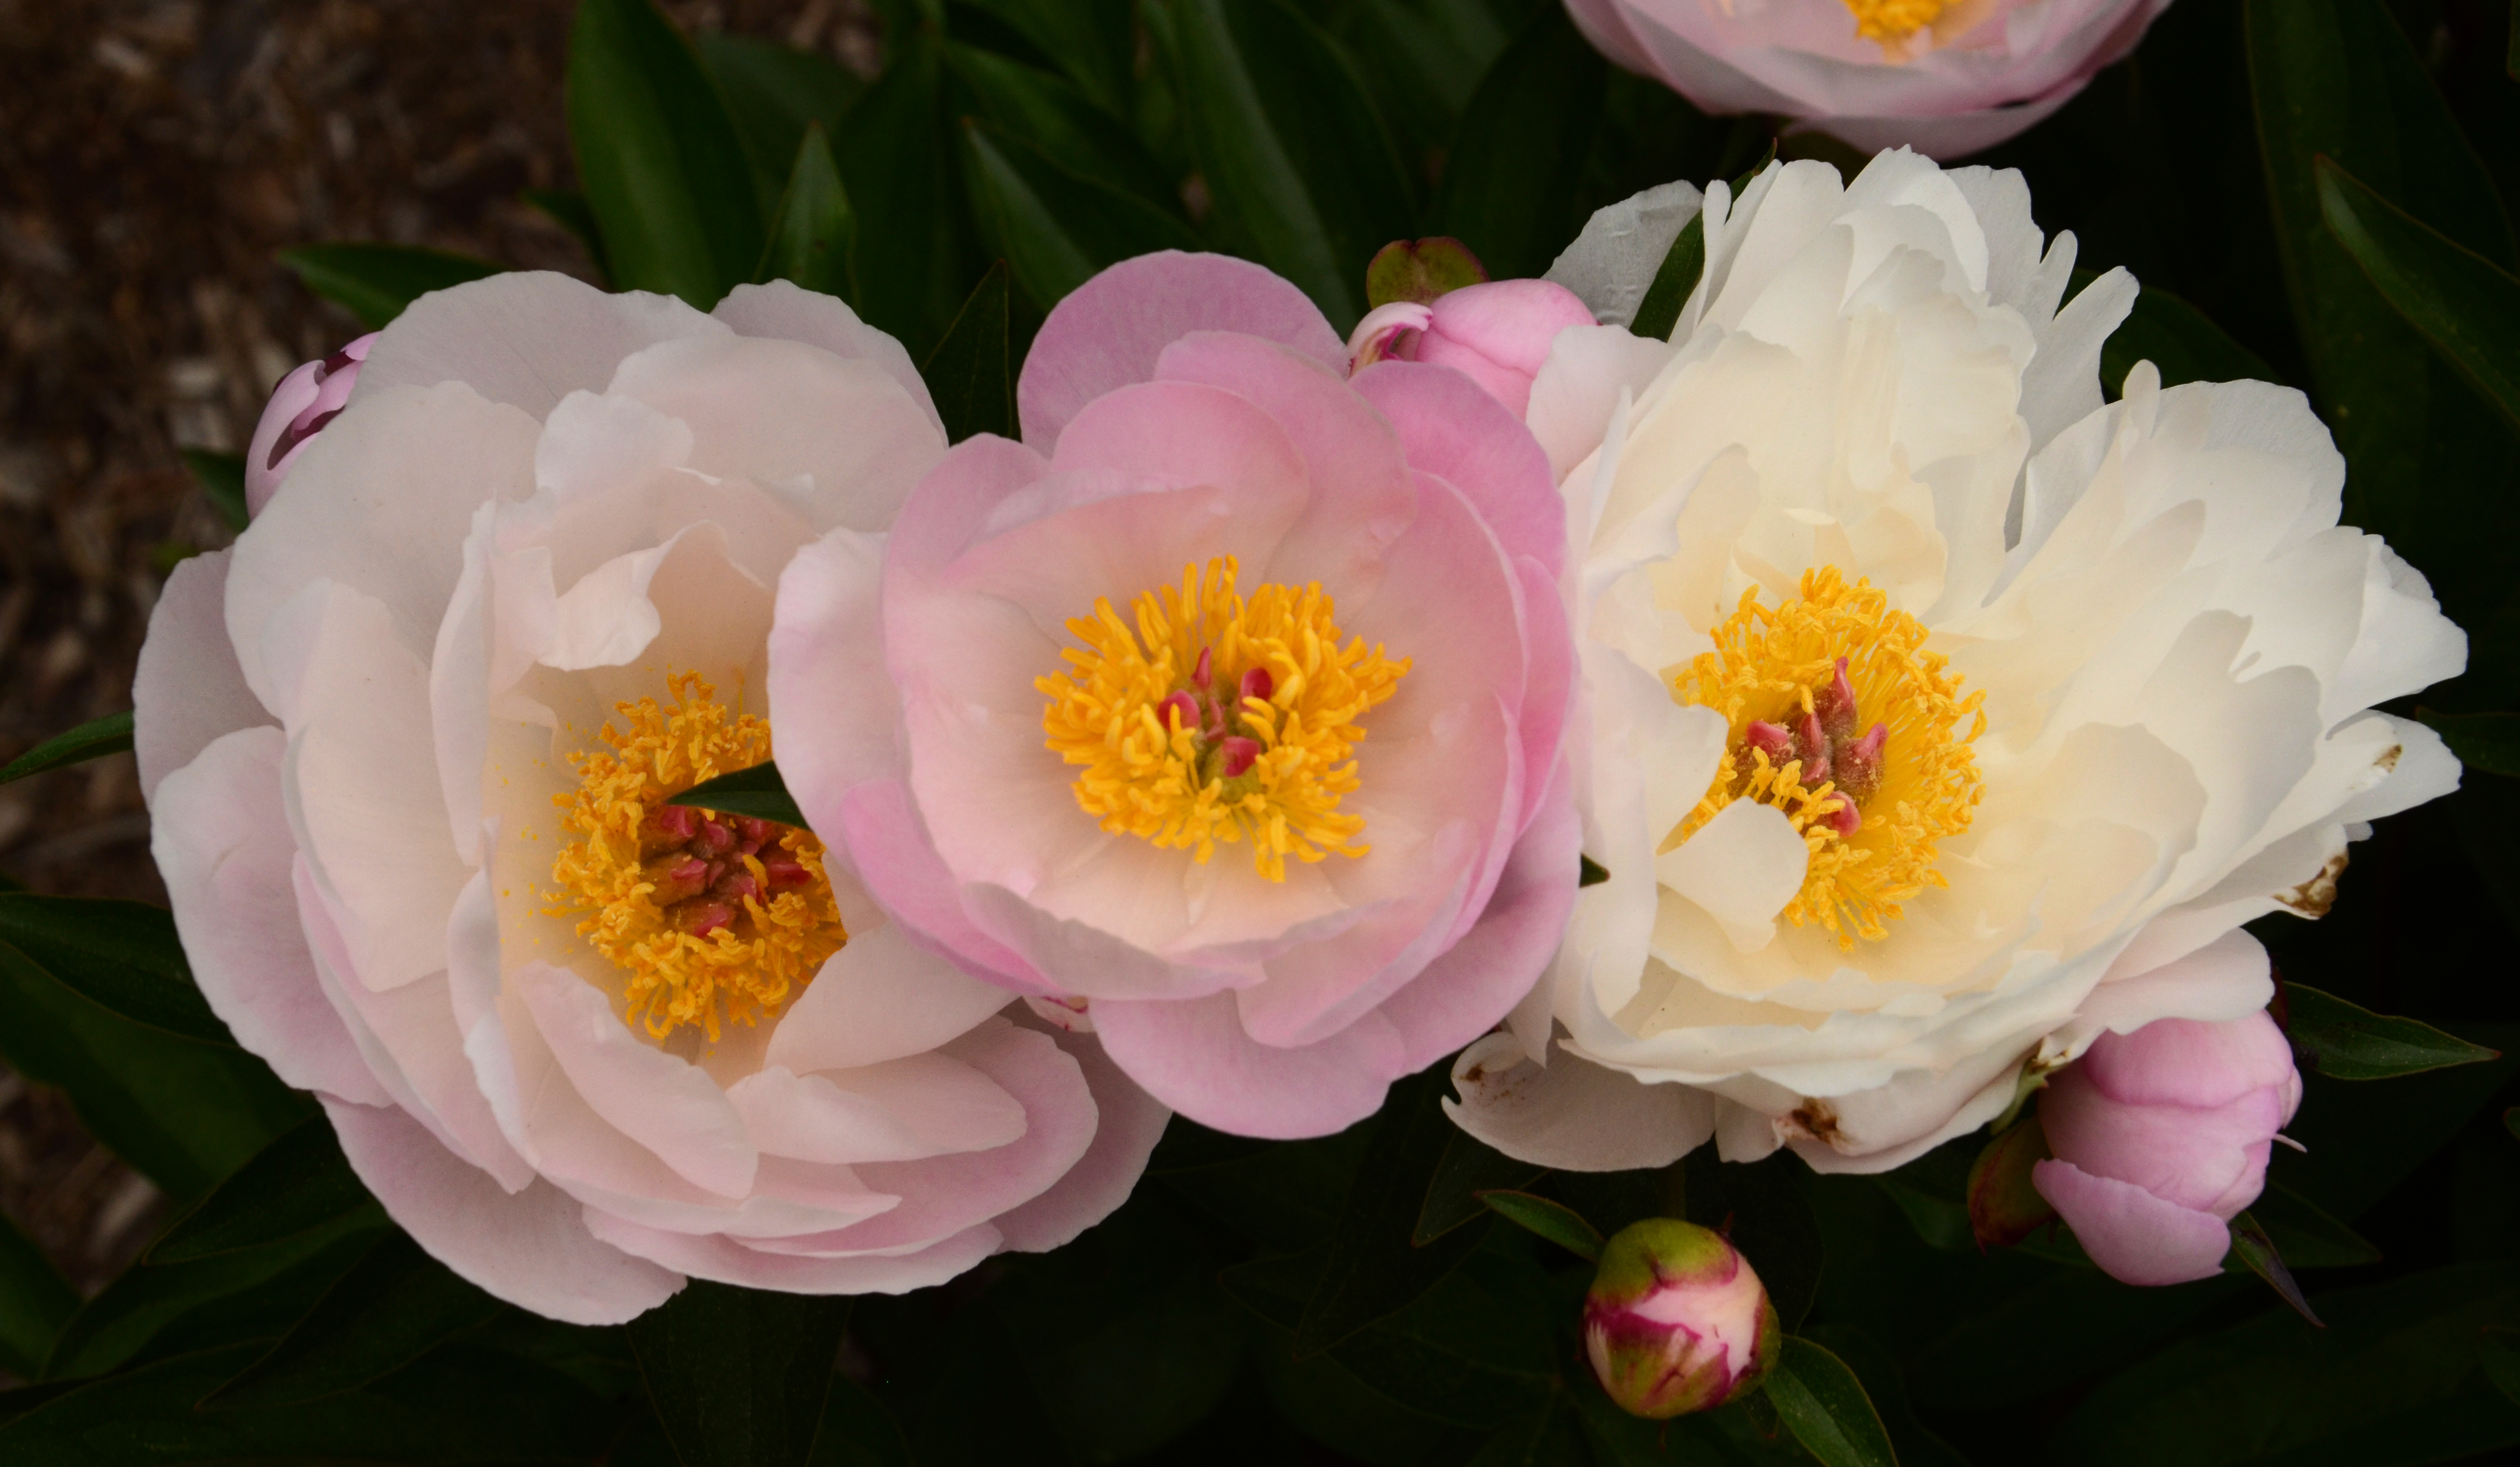
Luckily I also like to take non-stock close up of classic car details like this one:

03 2012 Cruise 1960 Corvette side copyright

so I balance my time with those.

You are hoping for a nice day but not too sunny that it gives you harsh shadows, as I had in this photo… In taking the photo you see I have an ISO of 100 because it was a nice sunny day, and a shutter speed of 1/125 to aim for that focus at 100% magnification:

Woodward cruise info of shot

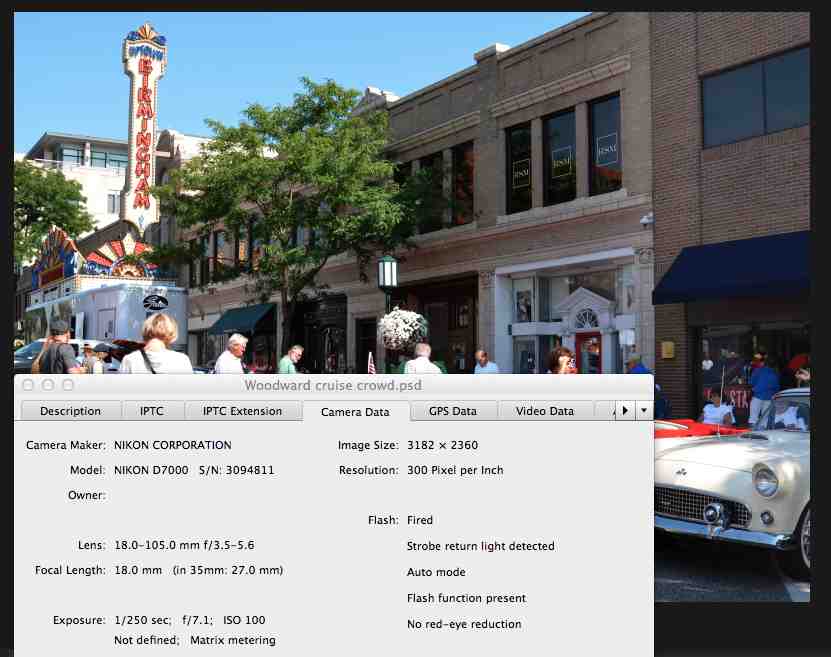
I tend to pick the shutter speed I want then adjust the exposure correction as needed if I go into shadowy areas, to get as much of the histogram covered (don’t worry if this doesn’t make sense right now).

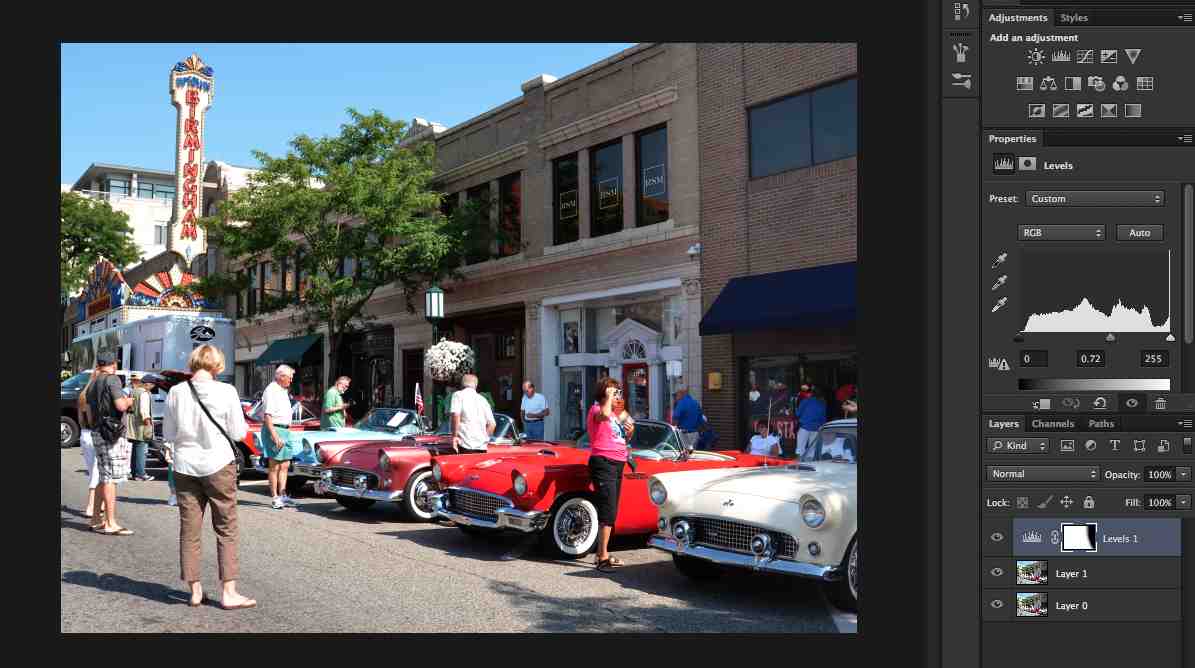
In Photoshop I create a duplicate layer (command-J), then crop it to show the street details but keep the focus on the cars:

Woodward cruise crop

I then look at the histogram. If I have to, which I didn’t here because I had usually play with exposure when I’m taking the photo to make sure I have a good histogram in the first place, I might have to play with the edge levers to but them up to the edge of the histogram so it expands the histogram to give you the full range. Then I play with the lever in the middle to give the photo some “pop”, but you can see that would make the shadow on the right very harsh, so I “masked” the layer on the right side just by drawing on it with black pen (with maybe 10% hardness so it blends easily and shows no sharp edges) on that right side. You can see in the layer description on the bottom right, labeled “Levels 1” how it shows a screen that is all white except for that black in the right area, where I “masked” it:

Woodward cruise histogram

Woodward cruise histogram close-up

OK, now the photo is all set, it’s time to enter the photo information. I access the “file info” from the “file” menu and enter a title, editorial headline description, keywords, and copyright information:

Woodward cruise file info

I save the file as a PSD file, then save a copy as a JPEG file, and that’s the file I submit to Shutterstock.

Hope this helped you get a sense of what to do. Questions? Ask me in the comments section.

Becoming a small business person

So I had been going along making some money with my photography hobby, then a bit more, enough to buy new equipment, and of course I was paying taxes on that money, but was not keeping track of expenses. I also decided to put in a proposal for the gifts of art program at UM, which if accepted, would allow me to sell my framed photographs, which means charging state taxes, and I need to be a business owner to charge taxes… you see it was starting to get big.

So, time to become a small business. I looked around the internet researching different business options and decided that since I don’t intend to shoot weddings or other such situations that might end up with me being sued, and I’m not planning to have employees, I didn’t think I needed to become incorporated. Instead I went with the “sole proprietorship” model, which in Michigan is sometimes also referred to as DBA, or “doing business as,” such as me doing business as Susan Montgomery Photos.

So time to keep the money separate. I checked my local credit union’s website about opening up a business account, and found out that I had to bring a “Certificate of Assumed Name or Doing Business As Certificate.” A bit of research in the State of Michigan website and I downloaded the form, got the notary public signature, filed at my county courthouse, back to the credit union, and voila, I have a business account, with checks and a debit card, and I started a Paypal account in my business name. Small business person me, who’d a thunk it.

One of my big points here is that I didn’t know anything about this when I started. I just took it one step at a time, learned what I had to learn, checked with some friends to make sure I wasn’t making any terrible mistakes, and I keep learning. Don’t be intimidated. There is a lot of knowledge out there, seek it out as you need it. As my neighbor Linda says about running 5k’s, “It’s just taking one step after another.” If I can do it, so can you – really!

Disclaimer: I am merely sharing my experience here, I have no legal expertise, so please do your own research to determine which options works best for you.

Review – Mike Moats Macro Bootcamp

I recently attended Mike Moats Macro Bootcamp.

It was everything I hoped it would be. A tell-it-like-it-is description of how he takes his wonderful photographs, to the level of detail that you can do it yourself. He covered lenses, accessories, camera details, the keys to flower and critter photographs, what buyers want, taking photographs at a botanical garden, elements of design and composition, finding character in nature, his workflow, including demos of how he uses software to clean up his photos, fun ideas for photography, and many many more.

He has lots of opportunities for you to try out his tips, with plenty of things to take photos of. He walks around and gives you advice, suggestions, and lots of encouragement. Overall a very positive experience.

I can already tell the difference when I’m looking for that photo to take, such as at the Matthaei Botanical Gardens earlier this week:

Matthaei peonies pink between whites

You can follow his blog to learn more about this amazing and amazingly generous photographer.

From the beginning…

So in this section I intend to chart my continued adventures into photography. I’m starting with this post that will bring you up to date as to how I got here. You can see my suggestions in Getting Started in Stock Photography, but this is more of the personal story.

I took some photographs when I was in school, fancied myself a good photographer, submitted them to a local contest, and when I didn’t place I decided I had been wrong and should just give up. So much for my confidence in my abilities!

Flash forward 15 years later and I was that mom that took photos of everything their kids were doing, and folks would ask me to take photos of their kids and send them copies. Before a family trip to Yellowstone in 2008 my kids encouraged me to get a DSLR camera, saying it would be a shame to take a little point and shoot when I took such good photographs, so I purchased a Nikon D40, which seemed an extravagant purchase at the time. Thanks for the support, guys!

Little by little I learned how to use some of the features of my camera. I like the approach I read about in an article once. Just go along until you find that you are frustrated about some issue with your photograph, then look up that issue online and figure out what camera feature will help you fix it, and learn that feature, and so on as you demand more of your photos. That philosophy kept me from becoming overwhelmed and losing confidence. Six years later I know about ISOs, apertures, white balances, etc. It wasn’t the fastest path there, but it has served me well. I also took some online courses, and get lessons through other means, as you can see in Resources for Better Photographs.

In 2009 I took a shot at getting into Shutterstock to help me improve my photos, and with a mind to take photography beyond a hobby. In Stock Photo Submission and Tutorial you can see my progression to the current 13 stock photo sites, though most of my stock photo income comes from Shutterstock, iStockphoto and Dreamstime.

At some point Shutterstock started requiring 4 MegaPixel photos and the D40 was a 6 MegaPixel camera, meaning that I couldn’t crop very much of the photo before it wasn’t eligible, so I was ready to move on to the next camera, my current D7000, which I bought from my local camera shop, Huron Camera in Dexter, MI. The folks there have been very patient and helpful, so I try to buy big items there to help ensure they stay in business.

I recently attended Mike Moats Macro Bootcamp which was tremendous, I learned so much in those three days, I’ve already seen an improvement in my photos:

Matthaei peonies pink between whites

One of my passions is car details

06 2013 Cruise 1957 Chevy flames

I recently submitted a proposal to the University of Michigan Hospital’s Gift of Arts program based on these car details, so we’ll see how that goes.

OK, that pretty much brings you up to speed. I plan to keep regular posts from now on updating my progress.

Best wishes in your own adventures,

Susan

Beware of copyrights and trademarks

When you shoot a non-editorial stock photo you have to be very careful to not have any copyrighted or trademarked objects in your photos. That means no logos on clothes, no easily identifiable copyrighted buildings.

I was going to write more about copyright but I noticed this great entry at Media Bakery Design that does a great job and includes a list of copyrighted work as well.

What this means in stock photography is that if there are any logos or other trademarked material in your photos you must edit them out before submission.

Note that if you plan to sell your photos for art (so NOT stock photography) that includes trademarked material that’s another story. To quote the World Intellectual Property Organization:

“Unlike copyright law, trademark law as such does not restrict the use of a trademark in a photograph. What it does forbid is the use of a trademark in a way that can cause confusion regarding the affiliation of the trademark owner to the image. If consumers are likely to mistakenly believe that the trademark owner sponsored a photograph, then there may be trademark infringement.”

Notice that this is just my understanding of it, and this is not intended to be legal advice, please do your own homework, laws do change…

Review – Ten Mistakes you are Making with your Photography

Lynford Morton is a photography coach who runs photography workshops in Washington, DC. You can download a very useful booklet from his website that reminds you of typical mistakes we can make when we are not thinking through our photographs.

I encourage you to download it and review it from time to time to check that you’re not making one or more of the 12 mistakes!

Review – National Geographic photography video courses

Many of us dream of becoming National Geographic photographers one day so what better resource than an actual National Geo photographer! I have considered attending a National Geographic photography workshop, but they are beyond my current budget and I was worried I wouldn’t be able to absorb that much information that quickly. So I was delighted when I found National Geographic photographer Joel Sartore’s video courses!

The set of “Fundamentals of Photography” and “The Art of Travel Photography: Six Expert Lessons” is currently on sale for $90, and well worth the investment. Fundamentals of Photography has twelve hours of video covering basics of equipment, camera setting, light, composition, plus specific advice for different kinds of photography. He takes you on the field and shows you how he thinks through and composes photographs. He also comes with a 150 page PDF guidebook that summarizes the lessons and his advice. I can already see an improvement in my thinking as a photographer from watching these videos. The Art of Travel Photography is composed of five hours of densely packed information that takes you along on some of his trips and gives you lots of information to improve your photography, plus an assignment with each lesson to get you started.

Mr. Sartore is very easy going, and makes his point with great examples of real photos he has taken both professionally and personally. He has many “in the field” examples where he shows you how he sets up a photograph, and how he improves on it. Remember that motto, “don’t take the shot, make the shot”. Mr. Sartore will show you how to do that.

Getting focus at 100% magnification

When I first started taking photographs the idea of having photos in focus at 100% magnification seemed impossible – but clearly it’s possible now… :) Some suggestions:

To check whether your photo is in focus at 100% in iPhoto, view your photo full screen and press “1” – it will magnify your photograph to 100%, so you can look around and see if your photo is in focus. To get it back to full screen press “0”. Disheartening at first, eh? No worries, you will get better.

Here are various suggestions that have helped me get to 100% – you won’t use all of them at the same time, each has their time and purpose:

Use a tripod – I use a Vanguard tripod, as recommended by the folks at Huron Camera Shop in Dexter. It is very sturdy, quite flexible, and small enough. Don’t forget to buy a ball head to go on top of it! Make sure you have turned off the vibration reduction “VR” setting of your camera, which will try to correct for motion that will no longer be there, creating its own motion, ironically enough…

Use a monopod – Sometimes a tripod is too much, so I use my monopod – it looks kind of like a cane, and you can screw your camera to it, giving you a steadier hold. Much easier to take into crowded places. Now I can take photos at 100% without the monopod, but when I started it was invaluable.

Use a fast shutter speed, at least as fast as the inverse of your focal length. So if your lens is at 100 mm focal length, shoot at 1/100 of a second or faster shutter speed. The less time the shutter is open the lower the chances that things will shake while the shutter is open. Sometimes I just run the camera on Shutter priority, increase the ISO so the camera is more sensitive to light and I won’t have to have the shutter as open, and adjusting exposure compensation to make sure I’m spanning as much of my histogram as I can. (and don’t worry if you have no idea what I just said, you’ll master ISO, exposure, histograms, just take it little by little. I took it one step at a time, you can too…)

“Roll” the shutter rather than pressing it. Don’t “click” the shutter but rather press it in a rolling motion, as if you were getting a fingerprint taken.

Set your camera on 2 sec, 5 sec, or 10 sec delay. If you’re shooting something that’s not moving, set your camera to a time delay. This way you can click the camera, wait for the camera shake to settle, then the camera takes the photo.

Use a remote shutter release. The Nikon one costs about $20 and lets you take photographs without touching the camera, reducing the camera shake.

Try some combinations of these and next thing you know your photos will be at 100% too. Have other suggestions? Include them in the comment section, thanks!

Review – Digital Photography School

I signed up for Digital Photography School’s tips and tutorials‘s RSS feed and I love getting their tips every day. Sometimes they might not be about something I’m interested in, like HDR, but more often than not I learn something from each, and on days that I don’t have time to focus on photography I appreciate staying connected to photography through their posts.

I would suggest if you’re just getting started you take a look at their Digital Photography Tips for Beginners for quick introductions to exposure, shutter speed, ISO and apertures.

… then take it from there – you could spend hours (and I have…) reading their non-ending set of tutorials with many excellent suggestions, and if you sign up for their RSS feed the tips will just keep coming – or maybe Pinterest or another means is more to your liking…

Review – Lynda.com photography and Photoshop courses

I find lynda.com courses tremendous resources to learn Photoshop and improve my photography. It costs $25/month, so I just subscribe for a couple months each summer, when I have more time to devote to it. Courses I’ve taken the past four summers include:

Shooting with the Nikon D7000 – Ben Long is just the best at patiently walking you through every single button in your camera to teach you how to get the most out of your camera. I started with a Nikon D40, a 6MP camera, and after I got more serious about stock photography moved up to the D7000 to have a 16MP pixel camera, so I could have more flexibility with my photos, knowing I could crop them and still have photos large enough to be accepted into stock photo sites.

Foundations of photography: Composition – Ben Long does a great job of teaching everything you need to know about composition – perspective, symmetry, rule of thirds, photographing people, landscapes, with terrific examples and assignments.

Foundations of photography: Exposure – Ben Long again, teaching you about the effect of shutter speed, f-stops, aperture, light balance, in an easy to understand style.

Photoshop Top 40 – Deke McClelland starts you off with a great set of essential tools within Photoshop. I go back to it as a refresher.

Photoshop CS4: Image Adjustments in Depth – After taking a Photoshop CS4 workshop, this more in-depth set of sessions from Jan Kabili takes you to the next level with easy to understand tutorials.

Photoshop CS6 Essential Training – A very detailed introduction to CS6 by Julieanne Kost, teaches you about layers, masks, retouching, filters – lots to learn here. I’ll probably refresh my memory with this class this summer.

I have not been disappointed in any of Lynda.com’s offerings. They have knowledgeable, easy to understand, patient instructors that are a pleasure to learn from.

Review – Shutterstock forums

One way I learned what made for a successful stock photo was to read many year’s worth of Shutterstock critique forums. I just read one after another after another and found a generous community of photographers who will give you suggestions about how to improve your photos to get accepted into photography sites. At first the photos the newbies posted looked all right to me, but after a few hundred posts I could look at the photo and predict what the respondents were going to say – that’s when I knew I was ready to submit my photos!

You can see a great example of a photographer who at first was not accepted, then sought advice from the forum, and after acting on their suggestions got in here.

Laurin Rinder and David Smith are particularly helpful, and I got my model and property release templates from Laurin.

Go take a look, you’ll learn a lot!