Shooting stock photos – Roller Derby again!

(A special note for the folks I know through the University of Michigan: I’m a photographer in my other life and realized a few months ago that LinkedIn rules state you can only have one LinkedIn page, so I had to merge my UM and photography pages, so expect some photo related entries when I update my photography blog…)

I got my camera fixed in time to attend another Ann Arbor Derby Dimes bout last Friday, those wonderfully supportive women who give me free passes to their bouts and a nifty Media Pass…  I got to try my new lens, a Nikon 24-70 mm f/2.8 that I’m proud to say I bought with my photography earnings. I got it at Camera Mall, a very nice relatively new camera shop in Ann Arbor. The folks there are super helpful and supportive. I also took along my “nifty fifty,” a Nikon 50 m f/1.8G that I got a few years ago then didn’t ever use as I got shy about street photography, sigh… But I’m learning to say “oh, well,” figure out the lesson to be learned and move on rather than linger on past mistakes, so, oh, well, at least I had it to use now.

The new lenses made such a difference!  At a larger aperture more light came in, so I could have a faster shutter speed, thus able to capture the action in much better focus, yey! Remember, the aperture is the fraction of the lens that is open, e.g. f/8 on a 50 mm lens means a 6.25 mm diameter opening, so the smaller the f-stop the larger the lens opening when you click the shutter, thus “larger aperture” means “smaller f-stop.”

I also brought my monopod, made me look a bit dorky but at my age I don’t really care much what people think of me anymore, and it added another level of steadiness so the photos came out sharper.

You can see the photos I submitted to them at the Derby Dimes facebook page.  Some of my favorites are:

DSC_9572

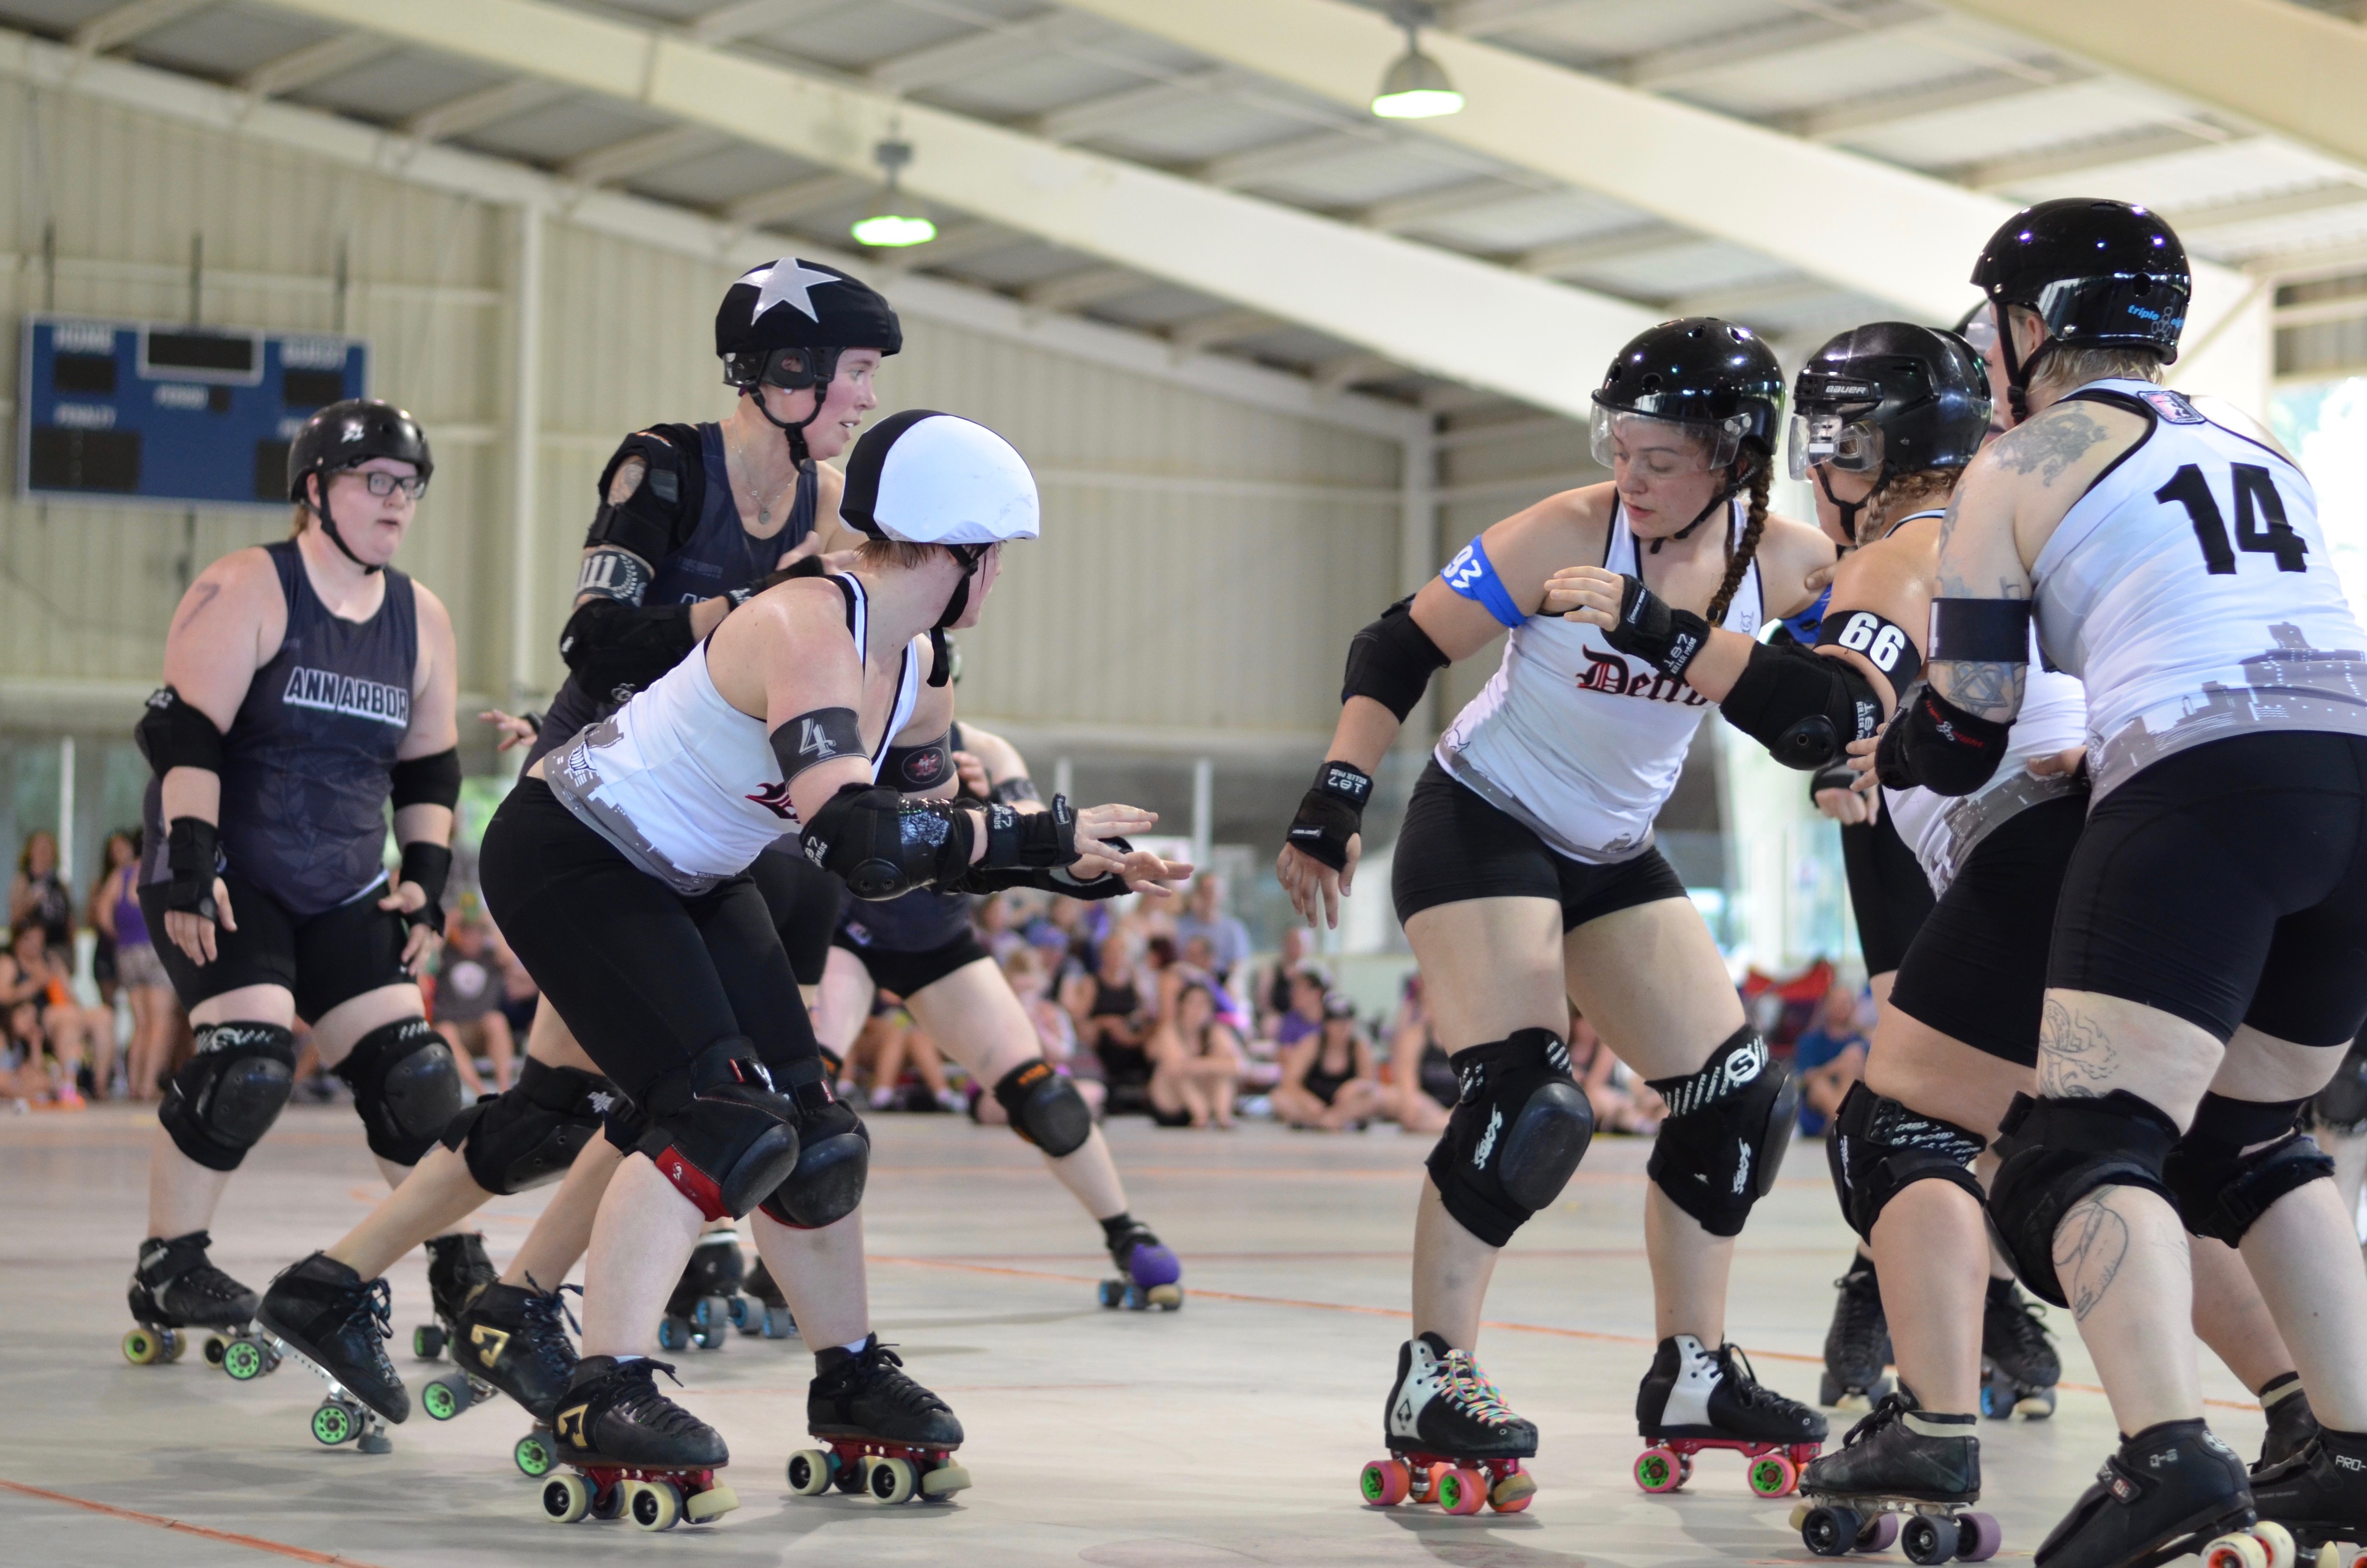
50 mm lens, ISO 800, 1/400 sec, f/2.0

DSC_9597

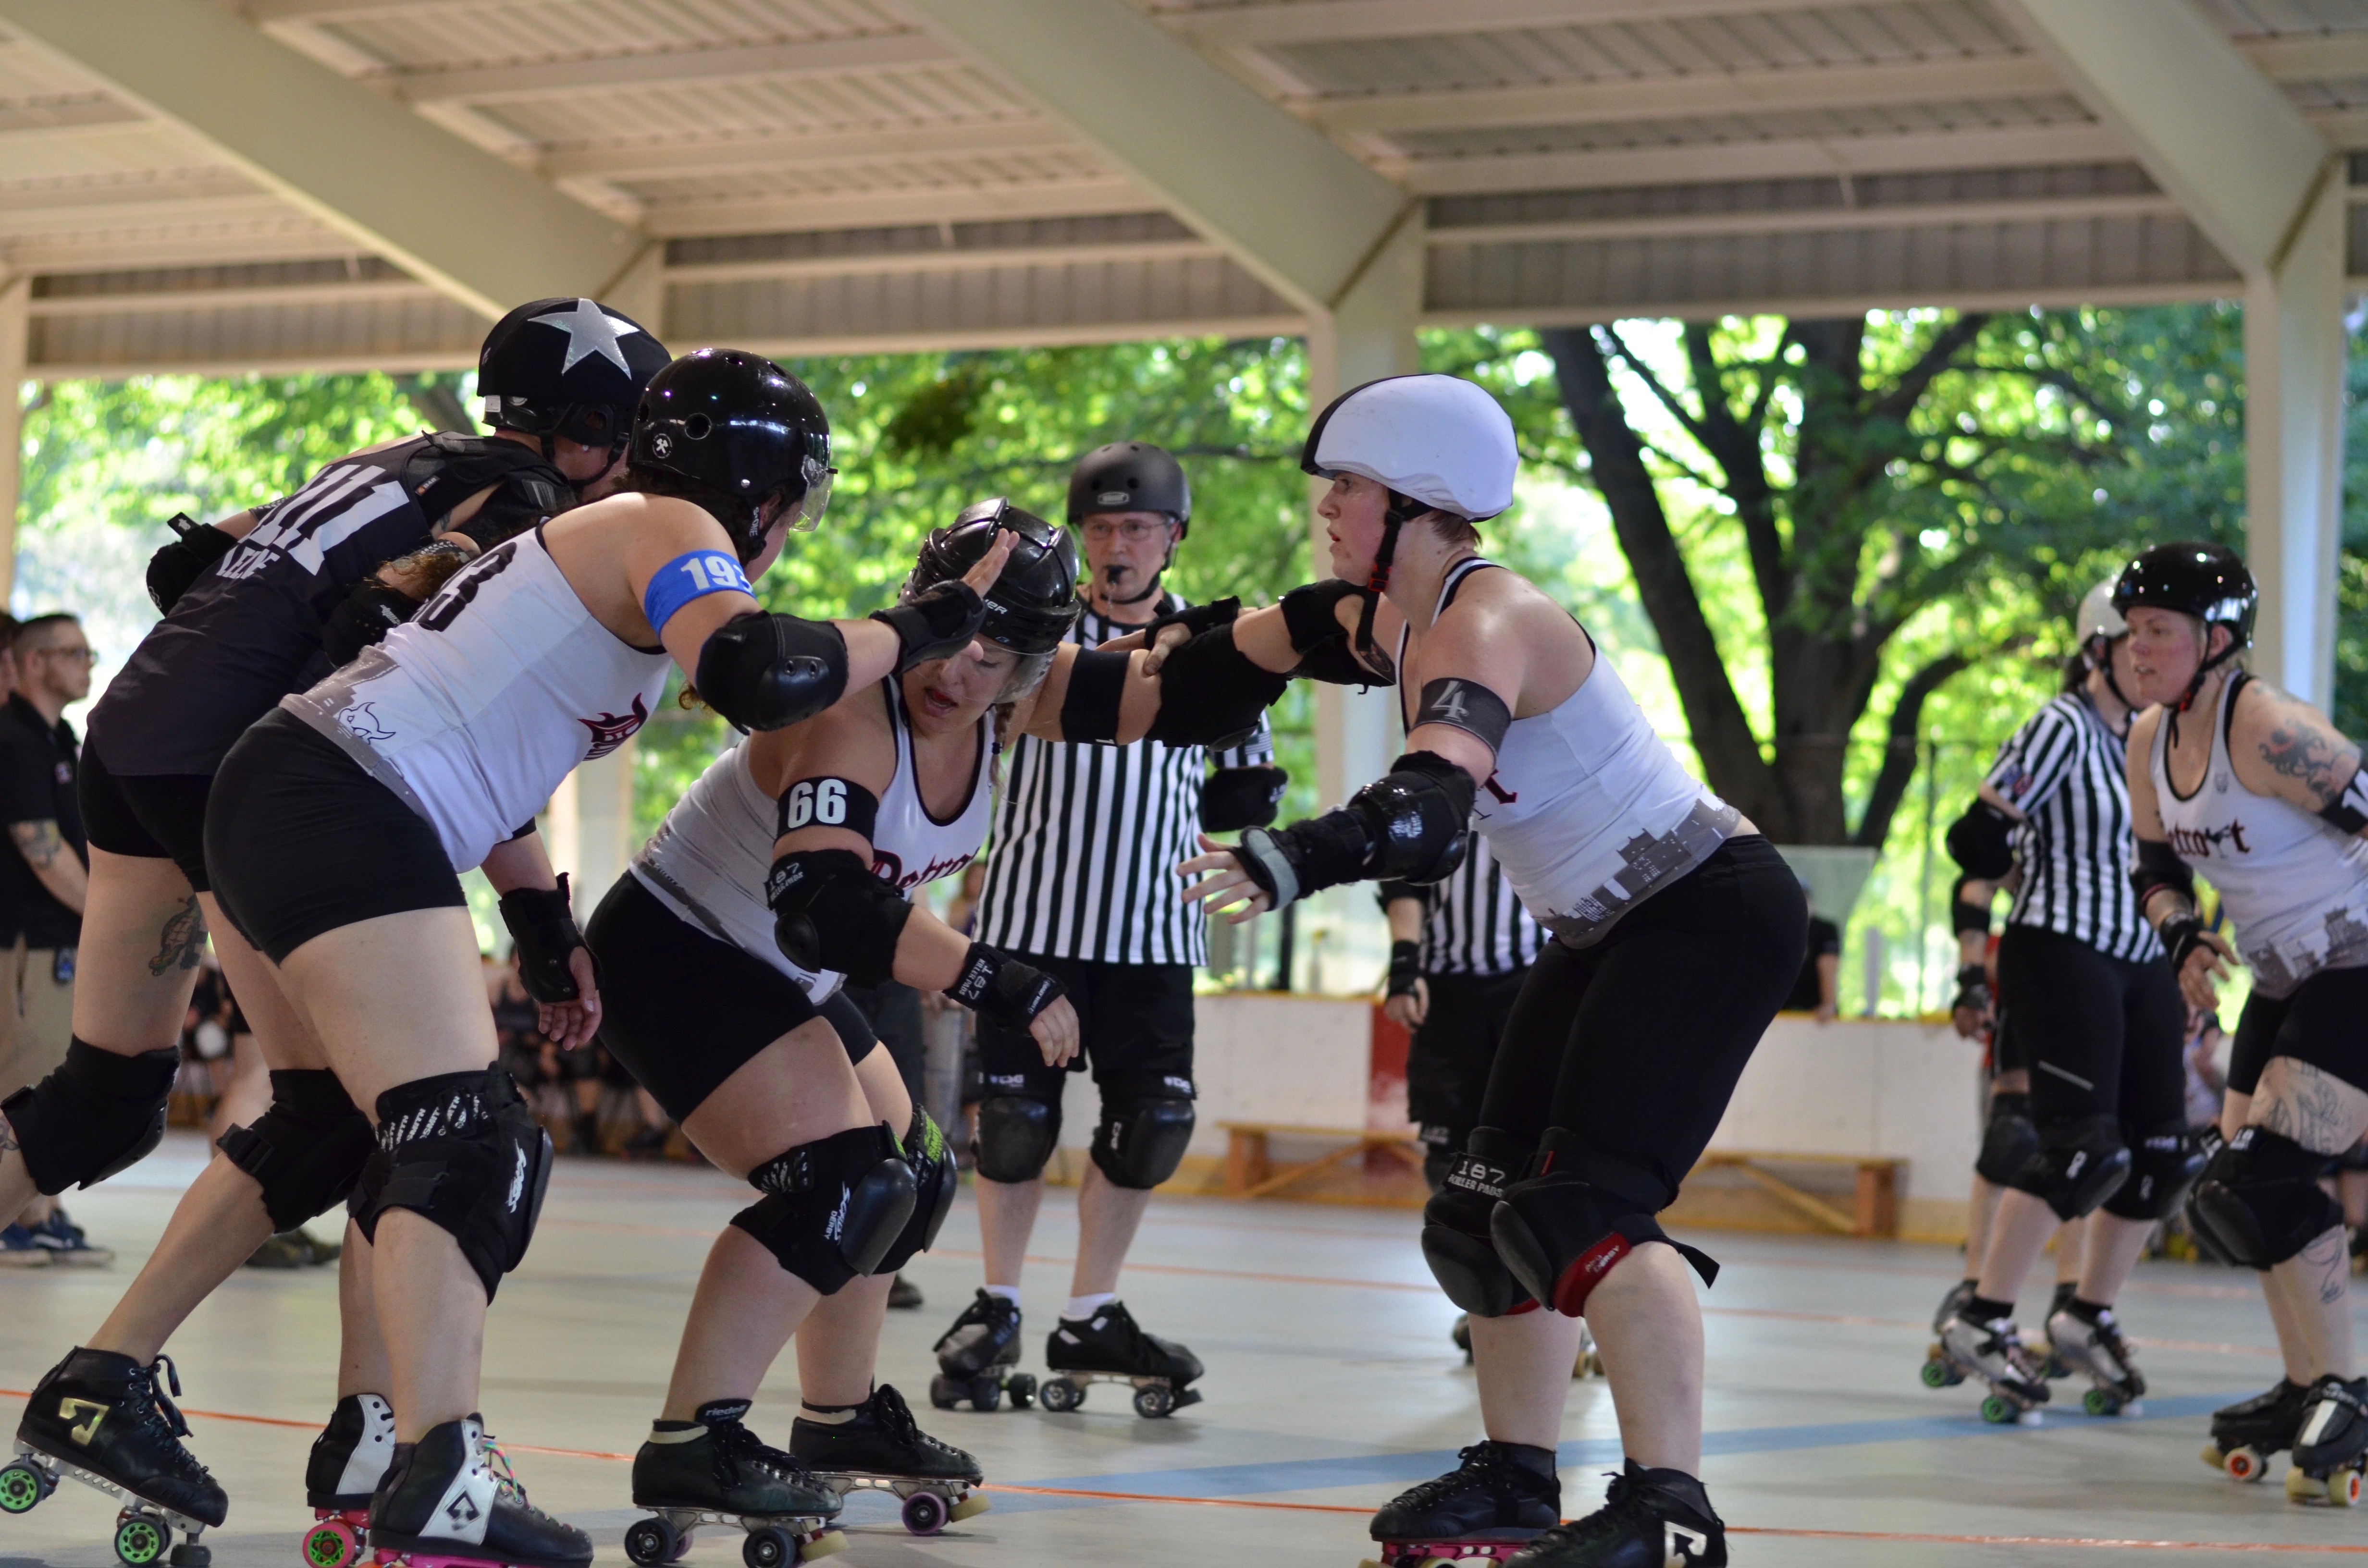
50 mm lens, ISO 800, 1/640 sec, f/2.2

DSC_9745

50 mm lens, ISO 1000, 1/1000 sec, f/1.8

DSC_9892

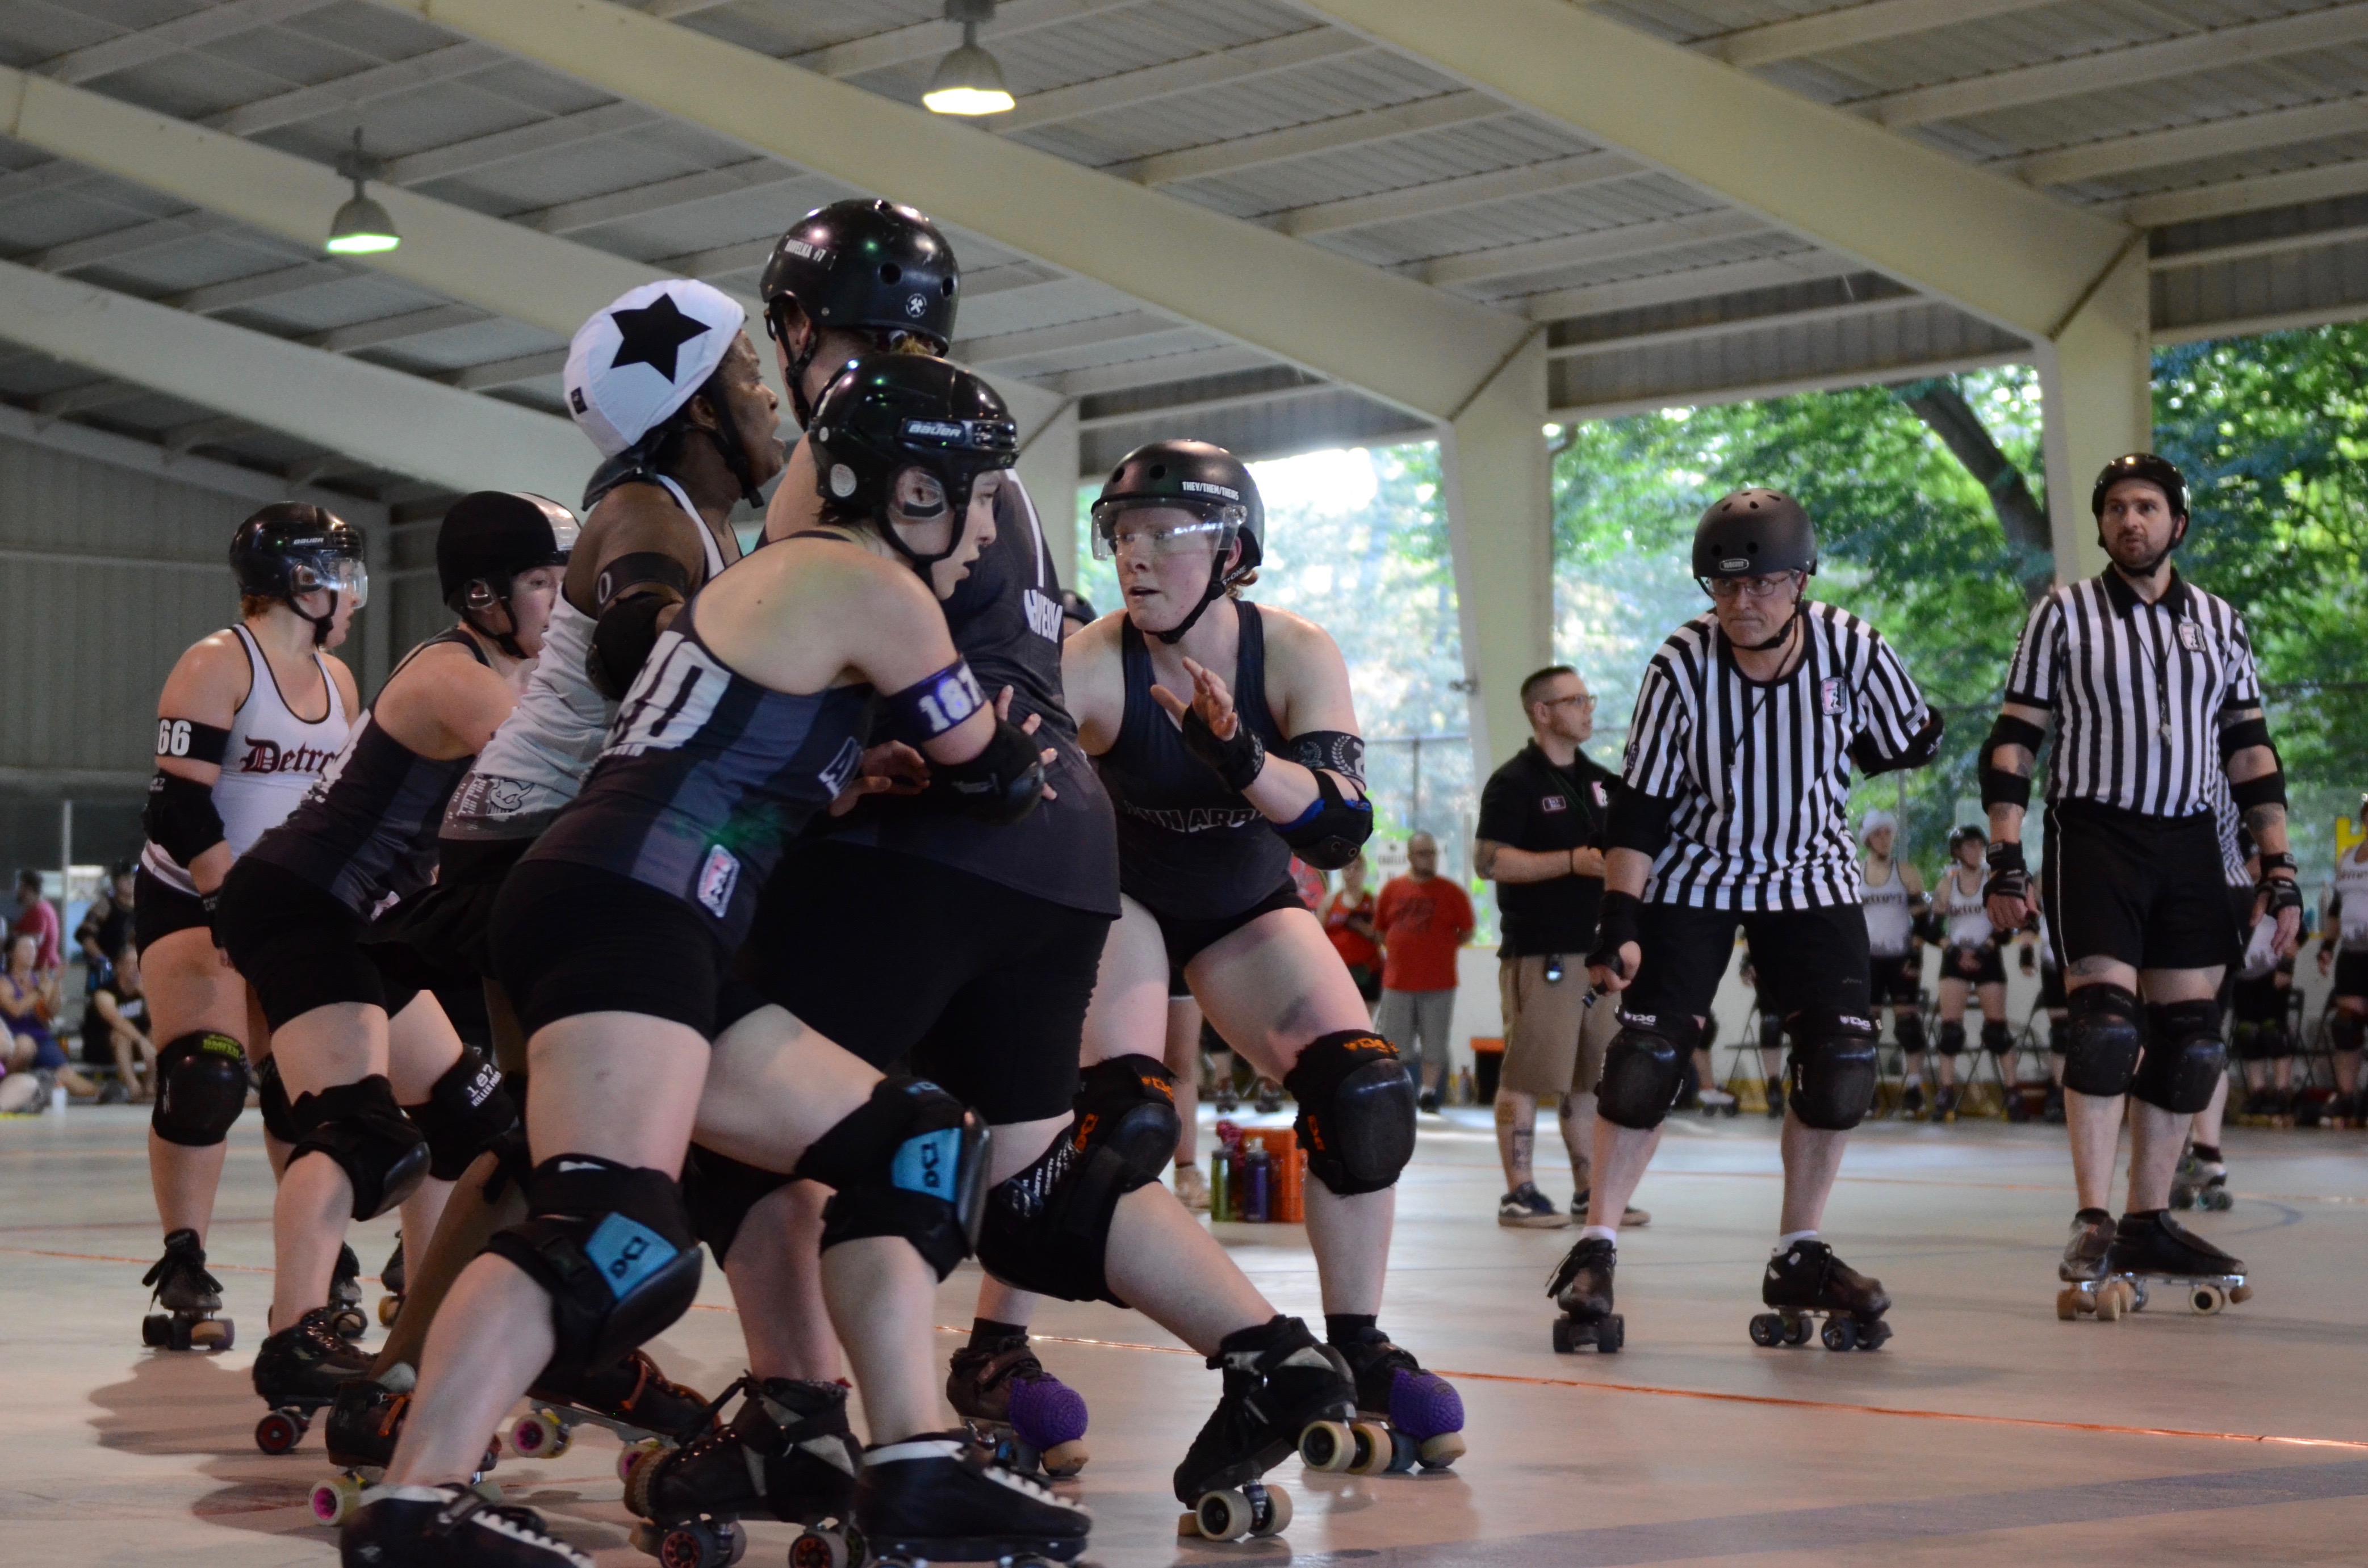
24-70 mm lens at 42 mm, ISO 1600, 1/500 sec, f/2.8

What I’m pleased about:

  • With the new lenses I had much more light coming in, could go with faster (shorter) shutter speeds, so captured the action better.
  • Taking the time to learn about the sport so I better understand what is going on. Still have much to learn, but I’m getting there, and it helps me anticipate and frame the shots better.
  • How wonderfully supportive the team is of everyone, of each other and of the other teams, and making me feel very welcome.
  • The opportunity to show strong women in action, and never sharing any photos that might embarrass anyone.
  • Including the refs in the photos, for a full shot of the action and to show appreciation for their work.
  • As for backgrounds I like the first photo because the back wall makes for a much nicer background compared to the trees.
  • I notice that 3 of my 4 favorite photos are with the “nifty fifty”, the 50 mm lens, which let much more light in than the 24-70 mm (f/1.8 vs f/2.8). Notice that the aperture it selected for the shutter speed I set is larger than I could have gotten with the 24-70 mm lens.
  • Having the 24-70 mm lens, however, allowed me to also get wider shots than I couldn’t have gotten with the 50 mm, sometimes the 50 mm was too constraining. Notice the last photo is at 42 mm, which allows me to include the refs.

Altogether a very fun evening of roller derby and photography, learning every day.

It really is about getting out there and trying things, messing up, learning from your mistakes, trying again. I got my first “real” DSLR (digital single lens reflex) camera in 2004, shot mostly my kids activities and family trips for a short time, took an online photography class at the local community college in 2010, have taken Lynda.com photography and photoshop courses most summers, took two Great Courses video courses by Joel Sartore of National Geographic in 2014, started this blog in 2014…

Just keep chugging away, keep learning and trying, and next thing you know you’ll feel comfortable with aperture, ISO, shutter speed, etc.

Best wishes on YOUR photography adventures!

Susan

Advertisement

Shooting stock photos – business trip to Indianapolis

I traveled to Indianapolis on a business trip and took advantage to take some stock photos. Steps I took to prepare:

Made sure my equipment was ready – Camera lens clean, battery and back up batteries charged, lots of space in the memory cards

Searched for stock photos of Indianapolis – It was clear folks had done a great job of skyline photos, so no need to do those, got some ideas for others.

Searched online for popular Indianapolis sites – Got some nice ideas, a river walk, monument circle… Added them to my reminder app on my iPhone.

Searched things to do and events – Googled for events calendars to see if there were any interesting events that might yield some good photos, good to know beforehand.

Got familiar with the area – Looked through a map of the area near the convention center, where the meeting was, so I could see which locations were nearby and I could catch during lunch breaks, etc., and which would be more of a drive.

I took some notes on some things I think I did right, so todo’s:

Take photos even in bad weather – Weather wasn’t great the first evening I got there and there were some bad shadows, but I had the time so I scouted some locations, got some just in case photos.  When I had the chance to go back I knew exactly what I was going for.

– Get the basics right first – First thing I did was check my ISO (100 if outside and sunny, down to 400 on really cloudy day, much higher if inside), then my shutter speed (1/250 to help ensure decent focus, else if inside I’d taken my monopod I’d have gone with a slower shutter speed). Took some test shots and checked my histogram to make sure I wasn’t missing some very dark areas or blowing out light areas, and adjusted the exposure as needed.  Exposure of +x moves the histogram to the right, of -x moves it to the left.   (My Nikon D7000’s presets are such that you have to rotate the exposure wheel to the right to decrease it and the left to increase it, which seems counterintuitive to me – I forget how I did it but you can change the preset so rolling right increases exposure and rolling left decreases exposure, so my finger motion matches what I want the histogram to do. Unfortunately I can’t remember how I did that and can’t find it – If you know it, please include in the comment section, thanks!)

Wait for the right shot – I took many outdoor shots of locations, and I would take a few shots then wait around to see if the scene got better, aiming for more folks in the shots, maybe a bicyclist riding past for additional interest and depth, think more “layers.”

DSC_3133 copy

Not something I would do on a family trip, but being by myself I could afford to do so. 

– Check the edges of the photo  – Sometimes I’d think I have a great shot but there was something in the edges of the photos that would have ruined it. Just moving a bit to one side or the other, or kneeling, would remove it.

Get farther  – When I shot the “perfect” shot I would shoot one more with a little less magnification, for a bit more flexibility when editing/cropping.

Get closer – I tried to avoid taking the standard tourist shot, still working on that one.

– Think of what photos you haven’t taken – Sometimes I’d think I was done then realize there were other looks, other angles, vertical vs. horizontal, tried to push myself to come up with better views.

– Be open to serendipity – I noticed some donation boxes to feed the homeless, so I shot some photos of it and people walking past it. Also realized that there are rental bikes available in Indianapolis, and my photos of those in Chicago are fairly popular, so I shot some of those too.  Walk around with an open mind.

DSC_3150

– Go for the iconic shot – I tried to think of an iconic image, not only the natural tourist shot. Still working on those.

– Take pictures of any descriptive plaques – Often public locations have a plaque describing it. I always grab a quick photo of it, for interesting information I’ll use for the photo description.

What other suggestions would you have for someone taking some stock location photos with limited time? I invite you to share your tips in the comments.

I’m going to edit, crop, and generally clean up the final photos and submit them, wish me luck. Search my Shutterstock site for Indianapolis soon to see how I did…